FIELD NOTES / 10 / English guide
Transport Fever 3 Railway Signals: Fix Stuck Trains and Expand Shared Track
Diagnose the path a train needs, create usable passing space, keep junctions clear, check one-way restrictions, and validate a second train before scaling up.

Updated Oct 11, 2026 · Based on official manuals and public tutorials, with key material rechecked. Version differences are noted; not individually playtested.
On this page
Adding a second train changes the railway problem. A route that one train can use may contain no safe, usable place for another to wait or pass. The first question is therefore where both trains can go and wait, not how many signals you can add.
Build your diagnosis around one complete encounter. The official signal manual contains current configuration examples alongside some text retaining the previous game's name. Use the examples as a reference and check the actual route preview and warnings in your version.
01 / Preserve a working one-train railway
Run one train through both endpoints and back. Confirm depot access, continuous track, valid terminal assignment, and vehicle compatibility. A second train cannot repair a missing rail connection or an unusable platform.
Check the service as well as its path. A train waiting for absent output is a supply problem before it is a shared-track problem. If the first train never completes useful transport, resolve that baseline using cargo planning or the passenger journey checks.
Save this working arrangement before adding vehicles or changing track. A preserved baseline lets you identify what the expansion introduced rather than diagnosing every part of the system at once.
02 / Follow the stopped train's intended path
Select the train, identify its next stop, and display its line. Examine the route it needs, the terminal it targets, and the track occupied or reserved ahead. An empty neighboring rail does not prove that this train has a usable path through it.
Distinguish temporary waiting from a layout that cannot resolve. Watch what the other train would have to do to release the necessary path. If each waits for track held by the other, raising a priority setting is unlikely to create the missing passing opportunity.
Investigate the requested route, including occupancy and reservations. Official manual image, © Urban Games.
Do not assume a regular station call automatically provides every reservation boundary you need. Consult the configuration examples and inspect how the current train actually requests its route.
03 / Make the passing place work for the entire train
A siding requires usable connections at both ends, compatible direction choices, and waiting space. Draw where each train enters, where it waits, and how the opposing train continues.
Consider the whole consist. A head reaching the siding does not help if its tail still blocks the switch the other train needs. Likewise, additional track beside the main line is ineffective when a train's assigned platform prevents it from using that track.
For a test, run two short consists and observe one encounter at low speed. Confirm that one can wait clear while the other passes, then repeat after any length change. The official passing examples explain why useful path division matters.
If traffic continues increasing, consider a double-track arrangement. Check the approaches and shared switches too: adding parallel route track leaves the station throat as a possible bottleneck.
04 / Check one-way restrictions in both service directions
One-way organization can make directional running clearer, but a restriction also removes movement in the other direction. Identify whether the section is truly directional or still used for return journeys and passing.
After changing a signal, inspect both legs of every affected line. A departing train recovering movement does not establish that the returning service remains possible.
Then review the primary and alternative terminal choices. Empty platforms are useful only when they are enabled and reachable from the relevant approach. Changes to platforms or switches can leave a line targeting its previous unusable position.
05 / Protect junctions from waiting train tails
Trace a stopped train from its front to its last wagon. If it occupies a crossing another train needs, the waiting position may be the problem even when the front has passed the switch.
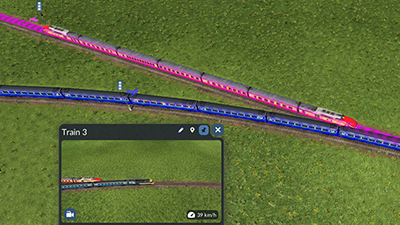
Leave waiting room for the longest intended consist. Official manual image, © Urban Games.
An illustrative failure is a previously successful siding becoming unreliable after more wagons are added. Compare the new consist length with the usable waiting space before declaring the signals broken.
Solve the specific conflict, then observe another encounter. Avoid scattering signals across the network without checking whether the resulting stopping positions can obstruct other routes.
06 / Approve the second train with a repeatable test
Check that both trains complete their intended route and return. Watch an actual encounter, confirm usable waiting space, and inspect the affected terminals and warnings afterward.
Next check why the extra train exists. If the line's supply or passenger use cannot fill the original service, more capacity may only increase running cost and occupation. Use vehicle comparison to relate the fleet to the measured need.
Keep track of the correction that resolved the encounter: changed waiting position, reachable terminal, repaired direction, or additional passing room. That record is more useful for your next railway than an unexplained collection of signals copied from another map.
When pathing works but deliveries remain late or unprofitable, return to loading time, supply, and operating cost. The railway test proves movement; it does not automatically prove a healthy business.