FIELD NOTES / 06 / English guide
Transport Fever 3 Cargo and Production Chains: Build Your First Delivery
Work backward from demand, inspect production inputs and output stocks, choose compatible vehicles, configure pickup, and validate every stage of a cargo chain.
Updated Oct 11, 2026 · Based on official manuals and public tutorials, with key material rechecked. Version differences are noted; not individually playtested.
On this page
A cargo line is a promise to move a particular product from a place that has it to a place that wants it. A production chain adds dependencies before that promise can be fulfilled. Learn the one-stage delivery first, then trace the inputs needed for a processor.
This guide starts at the receiver. That makes it harder to spend money transporting a product nobody accepts. It also gives every station and vehicle purchase a clear reason to exist.
01 / Write a cargo order before drawing the route
Open the target town or industry and identify one exact requirement. For towns, distinguish commercial and industrial demands. For processors, read the production rule and required input stocks.
Record a producer, cargo, receiver, transport mode, and transfer requirement. A useful first order might be “available vegetables at a farm → commercial buildings currently requesting vegetables → road delivery.” If the matching pair is absent, choose a different order rather than crossing the whole world to imitate an example.
Avoid choosing the truck first. Its capacity is irrelevant until you know what cargo must move and where it should be accepted. The vehicle guide can help after the order is known.
02 / Separate production potential from stock ready for pickup
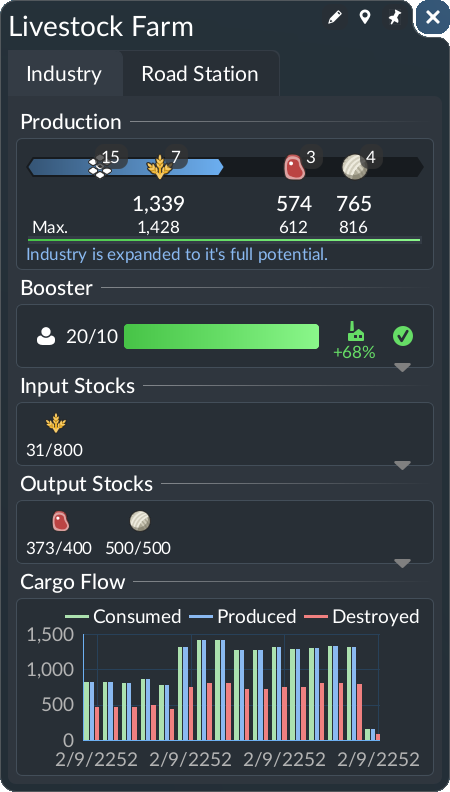
Inspect the source's production rule, input stocks, and output stocks. A maximum production figure describes potential throughput. Your pickup vehicle needs actual output available now.
Raw producers and processors behave differently. A processor waiting for a required input cannot supply finished cargo merely because a new outbound line arrives. Trace that missing input back to its source before expanding the finished-goods fleet.
Read the available output and its dependencies before sizing transport. Official manual image, © Urban Games.
For a chain exercise, sketch grain → livestock production → meat → a commercial receiver with meat demand. Read the actual production requirements in your save rather than assigning an assumed conversion ratio. First deliver the input; then verify output; finally operate the downstream delivery.
03 / Complete one route segment before adding a transfer
Place the source stop where it serves the cargo source and the receiving stop where it serves the actual consumer. Check compatible terminals and continuous access between them. A station beside the city center is not automatically linked to the buildings demanding your cargo.
For a road delivery, connect the depot and both endpoints. For rail, check the actual track and depot connection. The station-building guide provides the construction sequence.
Begin with a direct segment when your map permits it. A ship-to-truck chain introduces storage and an onward pickup stage; configure that deliberately using warehouses and transfers. Do not infer a cargo handoff from two adjacent transport buildings.
04 / Match vehicle compatibility with stop configuration
Filter the vehicle store by cargo and review the candidate's available capacity and running cost. Then open the pickup stop's configuration in Line Manager and allow the cargo you intend to load. “The truck supports it” and “the stop requests it” are different checks.
Inspect every relevant stop occurrence. On an out-and-back service, the same station may appear twice with different intended roles. Editing the wrong occurrence can leave the pickup configuration unchanged.
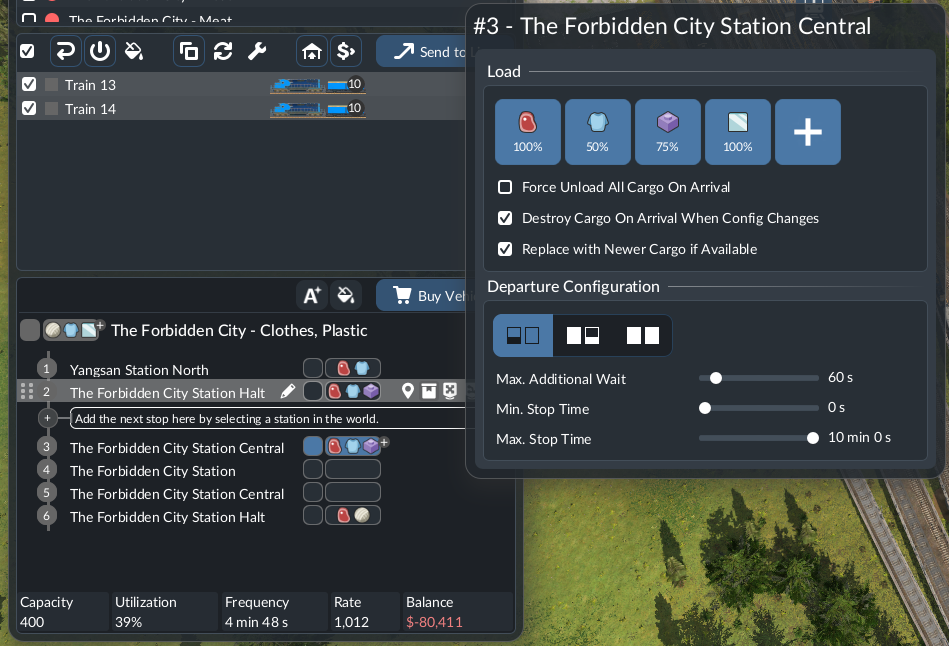
Configure the exact stop occurrence, then observe what actually loads. Official manual image, © Urban Games.
At the delivery end, distinguish unloading from reloading. A vehicle carrying cargo after a visit may have delivered some and picked up more. Watch the stock changes and operations before diagnosing complete refusal.
05 / Use simple departure behavior during the trial
Start with Load if available to expose the complete cycle. This lets you see whether pickup, path, and acceptance work without turning every supply shortage into an indefinite platform wait.
Full-load behavior can reduce underfilled departures, but it also increases waiting and occupies station space. Consider it after the route works. Use a maximum waiting limit suited to the observed source and capacity instead of copying one number across unrelated industries.
Train and ship compartments make “any” and “all” distinctions relevant in ways that do not apply identically to every vehicle. Read the actual departure option, cargo mix, and remaining compartment capacity. The official line manual describes these controls.
Compare two trials with the same route and vehicles: straightforward loading first, a single waiting change second. Record delivered cargo and complete cycle time. A fuller departure is not automatically better if the added wait sharply reduces useful trips.
06 / Verify normal acceptance at the final receiver
Follow the vehicle from pickup. Observe its load increase, movement to the receiver, and normal unloading. Check input stock or town supply at the destination afterward.
An empty return vehicle is incomplete evidence. Forced unloading may discard unwanted cargo; arrival at a warehouse may only finish an intermediate stage. Your test is delivery to the intended consumer, not a vehicle state that happens to look convenient.
| Stage | Evidence to look for | A failure points toward |
|---|---|---|
| Production | Required inputs and available output | Upstream supply or production |
| Pickup | Cargo enters a compatible vehicle | Coverage, filtering, or compatibility |
| Transfer | Stock enters and leaves the storage point | Warehouse access or onward transport |
| Final delivery | Receiver accepts the product | Demand, stock room, or destination coverage |
If the earliest failed stage is pickup, go straight to cargo not loading. If a transfer stock accumulates, investigate the onward stage before enlarging storage.
07 / Plan supply and transport in consistent units
A calculator can help only after its inputs are understood. Use actual output, receiver demand, cargo compatibility, and cycle time. Do not mix a rate per game year with a stopwatch measurement in real minutes without checking how the tool converts time.
For an arithmetic exercise, a vehicle carrying 18 units every six minutes offers three units per minute before delays or failed deliveries. If compatible supply provides only two in that same unit, purchasing more transport does not create the missing product. These figures are an example, not a game industry recipe.
For processing, use the ratios shown by the industry. If a hypothetical recipe needs two input units per output, a target of 30 outputs needs 60 inputs before other constraints. The recipe is illustrative; substitute the actual production rule.
Follow shortages upstream. If two meat services draw from one producer with inadequate grain, expanding both meat fleets addresses the wrong stage.
08 / Grow the chain around measured constraints
Introduce warehouses when services really need shared storage or a modal transfer. Research return cargo only when a compatible product has a receiver on the return path. Extend the network one dependency at a time.
Keep a written chain alongside the map: source output → pickup → storage if needed → onward pickup → consumer. A new stage should add a clear task and a corresponding verification point.
For planning tools and the limitations of calculator results, see the wiki and tools directory. Keep in-game stock and actual deliveries as your final check.